Monday, September 10, 2012

Repurpose: Super Easy Dog Toy!

So this whole thing started when Ella was a puppy... I picked up some baby blankets from the thrift store for her kennel so she would be more comfortable in her kennel... and she started ripping them apart.


All you need is a baby blanket! I pick them up at yard sales and thrift stores for super cheap :)

Fold the blanket into a triangle and roll it like you would a bandana. Then tie a knot in the middle.


Then tie two more knots, one on each side of the first one...


All done! Give it to your puppies!


And let them play!


Cheapest tug toy around! Thanks for stopping by! :)

Thursday, September 6, 2012

Kirklands Home Jack-O-Lantern Knock-Off

So I was at Kirklands the other day, browsing the clearance section and decided to mosey on through the Halloween decor, and I saw THIS!!!......


And I thought to myself, HOW CUTE! And then I looked at the price tag and decided I wasn't ready to part with that much money... So I thought, I CAN MAKE SOMETHING LIKE THAT!

So I went home, made myself the last serving of an old oatmeal canister, and got to work!

I mod-podged tissue paper around the outside to give it a textured appearance (one piece of regular tissue paper torn in half worked perfectly for me).

After it dried (which I accelerated with a fan!), I spray painted it black, let it dry, and spray painted it orange.

Next, with Kirklands' help, I drew his face on the oatmeal canister and cut out the shapes --- I originally tried using a box cutter, but mine is a safety box cutter so the blade doesn't stick out far enough for it to go through the can... so I resorted to using a steak knife. I DO NOT RECCOMMEND USING A STEAK KNIFE AT ALL! It worked for what I needed, but I also cut my finger open (nothing serious, but please, please, PLEASE do NOT use a steak knife. Let my lesson be a lesson learned for you so you don't do the same!)

After I bandaged myself up, this is what I got:


Not perfect by any means (you can see on the right where the box cutter sliced diagnolly down his face... Poor Jack... We call him Scar lol) but I only had to go buy a can of orange spray paint... so this project only cost me $3 to make! (Speaking of spray paint, if you can avoid buying it at Michael's, do it, because often times Walmart will have the same brand and color or something comparable for half the price!) I'm going to try again and see if I can make Jack a girlfriend. Maybe she'll be a little prettier :)

Thanks for stopping by! :)

Hello :)

I'm just standing this blog up, so allow me to introduce myself. My name is Tonya and I'm married to a wonderful man who just got out of the Marine Corps a few months ago and is transitioning back into the civilian world. Oh, and I'm a Beagle Momma. :)

 
These are my brats --- Ella is full Beagle, and my little princess; and Duke is half Beagle/half Labrador (he's got the torso, ears and tail of a Lab and everything else is Beagle, so he'll always be puppy size haha), and he's my little sweet heart.
 
As far as crafts and DIY go, I can't sew (yet!) or anything else that really has anything to do with needles and thread... but I am willing to learn! I love working with canvas (but I can really only paint stick figures --- my art skills never went beyond that of a kindergardener....), repurposing, restyling, and saving myself some money! I love the clearance section, thrift stores, yard sales and craft stores :) oh, and have I mentioned I'm addicted to Pinterest? If there's anything else you'd like to know, just ask me :)
Again, thanks for stopping by, and I hope to see you back soon!

Wednesday, September 5, 2012

DIY Dog Bed for the Kennel!


So, my dogs are SPOILED! What can I say; they're my children. And my personal opinion is that kennels are not comfortable.... AT ALL! (You can't tell me you never tried crawling into a kennel when you were little, pretending to be a dog, only to get out a couple seconds later rubbing your knees...) So I decided to make them something "custom comfortable" for pretty cheap!

What you'll need:
Fleece (how much you'll need depends on the length and width of the kennel, 2x) --- I luckily bought my fleece from Hancock Fabrics during their "Fleece Fest" --- $4.99 a yard!
Mattress Foam Pad --- bought a twin size pad from Walmart for $9.99
Scissors --- whatever you have available, I used regular kitchen scissors to cut the mattress pad and fabric scissors for the fleece.
Tape Measure
Level (optional) --- for those who can't cut straight lines very well, like me!


First thing first, measure the length and width of the kennel! The one I was working on was 21in x 14in. I decided to double up the mattress pad so it would be more comfy, so I doubled the width when cutting the pad.


Once you have cut the pad to your dimensions, you can set it aside.

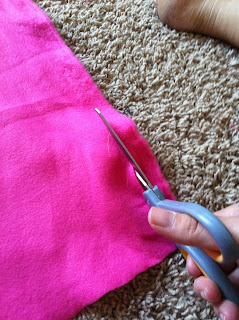
Pull out your fleece! I always slice off the extra curled stuff on the sides... It just looks sloppy to me. You can feel free to skip this step though.


(I later tied these pieces into knots and the dogs play tug with them now!)

Time for some simple math. Remember my kennel dimensions may be different than yours. I added 4 inches to the length and the width measurement (1 inch to cover the side of the mat and 3 inches for tying --- I didn't want a bulky seam, but if you want more tie-ability, leave yourself a couple more inches.) So I cut my two pieces of fleece to 25x19. Make sure you lay the "out" sides of the fleece so they are touching and you see the "in" sides on top and bottom, as we will be turning this inside out later to eliminate the tied seams.

 
(I can never get them to line up exactly, so don't feel bad if you can't either!)
 
As is the norm with no-sew fleece blankets, cut around the edges (I cut mine about and 2 inches in on every side).


If you so choose, you could take a breather here before all the tedious tying begins, as Ella and Duke so readily demonstrate...


Tie the two pieces of fleece together, making sure to double knot, and leave one side untied!


Turn the project inside out!


(Kinda looks like a pillow case, doesn't it?)

Put the foam pad we set aside inside and tie the remaining side up. I shoved the ends inside so that it would be uniform with the rest of the seams. And Voila! All done!


Put inside the kennel and let the dogs enjoy!


Happy Customers!
Thanks for stopping by! :) Let me know how this project worked out for you!